Grab 1 OF My Blinkies


My Logo

My Licenses


ChocUkDesigns On Facebook


Saturday, 30 May 2015
CT ChocUkDesigns For Dezignz By Vi PTU Tutorial For Darker Shade Of Spring Scrap Kit
CT ChocUkDesigns For Dezignz By Vi
PTU Tutorial For Darker Shade Of Spring Scrap Kit


DO NOT COPY AND SHARE
PLEASE DIRECT PEOPLE TO MY BLOG
DO NOT CLAIM AS YOUR OWN
Supplies Need:-
Scrap Kit Used: Dezignz By Vi's - Darker Shade Of Spring
Which You Can Also Purchase At
PicsForDesign
Tube: Tube Of Choice
I Have Used: An Exclusive Tube By Misticheskaya - Lady Spring
Please Note You Need A License To Use This Tube
You Can Download This Tube
By Purchasing An Exclusive Membership
At PicsForDesign
Mask: Vix_Mask362
Which You Download From Her Blog
Plug Ins: EyeCandy 4000 - Gradient Glow
Font Of Choice
A Working knowledge Of PSP
Please Note Tutorial Is For Tag Only
Lets Begin With My Tutorial
Open PSP and your Tubes
Open a New 700 x 700 Resolution 200
Use The Following Drop Shadow Unless Stated
V&H: 1 OP: 60 Blur: 5 Color: Black
Repeat V&H: -1
Open & Copy Frame (3)
Paste As New Layer & Move Slightly Up On Your Canvas
Activate Tube & Copy
Paste As New Layer
Resize By 20% & Mirror
Activate Frame Layer
Open & Copy The Following Elements:-
WA - NO DS NEEDED
67 - Resize By 50% - Mirror
7 - Resize By 30%
5 - Resize By 30%
16 - Resize By 30%
13 - Resize By 50% - Mirror
73 - Resize By 40%
25 - Resize By 50% - Free Rotate Right By 22 Degrees
31 - Resize by 50%
89 - Resize By 30% - Free Rotate Right By 22 Degrees
80 - Resize by 25%
24 - Resize by 35% - Mirror
Open & Copy Paper 5
Paste As New Layer & Resize By 60%
Layers - Arrange - Send Down To Bottom
Move To Inside Frame
Open Paper 22
Layers - Promote Background Layer To Raster - New Mask Layer From Image
Select Mask - Vix_Mask362
Make sure Source Luminance is checked only
Copy Merged and Paste as new layer
Layers - Arrange - Send To Bottom
Resize By 95%
Activate Your Top Layer
Layers New Raster Layer - Add All Copyright Info
Layers New Raster Layer - Add Watermark
Layers New Raster Layer
Select Your Text Tool
Select Your Font I have used Magnolia Light - Size 72 - Stroke 2 - Bold
Click Foreground and change to #c5b49c
Click Background and Change to #e1d3a3
Type Your Name
Convert Raster To Layer
Plug Ins: Eyecandy 4000 - Gradient Glow
Color: #563826
Glow Width: 3.00
Soft Corners: 25
Overall Op: 100
Draw Only Outside Selection Checked
Click Ok
All Done
Thank you very much for following my Tutorial
I would love to see your results
and
any feedback
Please Email Me
At
Dont Forget To Check-Out Vi's Blog
Tutorial Written By ChocUkDesigns
Retained by "Copyright © ChocUkDesigns 2015 All rights Reserved"
XAZG-7IWR-PPQX-GRIP
Friday, 29 May 2015
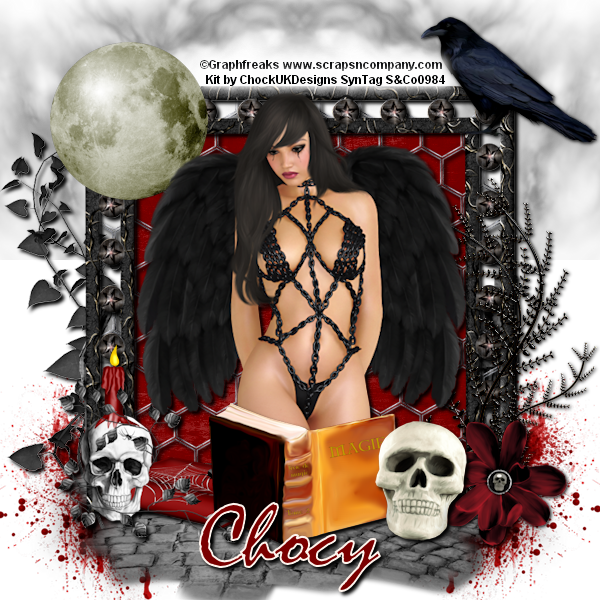
CT ChocUkDesigns For Michelle's Myths PTU Tutorial For Wicked Red Queen Scrap Kit
CT ChocUkDesigns For Michelle's Myths
PTU Tutorial For Wicked Red Queen Scrap Kit


DO NOT COPY AND SHARE
PLEASE DIRECT PEOPLE TO MY BLOG
DO NOT CLAIM AS YOUR OWN
Supplies Need:-
Scrap Kit Used: Michelle's Myth's - Wicked Red Queen
Which You Can Also Purchase At
PicsForDesign
Or
Smiley Creations Shop
Tube: GraphFreaks - Wicked Red Queen
Check-Out Her Blog
Mask - WSL_Mask84
Which You Can Download From Her Blog
Plug In: Xero - Softmood
EyeCandy 4000 - Gradient Glow
Font Of Choice
A Working knowledge Of PSP
Lets Begin With My Tutorial
Open PSP and your Tubes
Open a New 700 x 700 Resolution 200
Use The Following Drop Shadow Unless Stated
V&H: 1 OP: 50 Blur: 5 Color: Black
Repeat V&H: -1
Open & Copy Frame (6)
Paste As New Layer & Resize by 90%
Activate Close Up Of Wicked Red Queen & Copy
Paste As New Layer & Move Into Frame
Layers - Arrange - Move Down
Plug In: Xero - Softmood
Haziness: 60
Glow - Red: 50
Lock Sliders Checked
Brightness: 20
Contrast: 20
Click Ok
Adjust - Sharpen - Sharpen More
Layers - Properties
Blend Mode: Luminance (Legacy)
Click Ok
Layers - Duplicate - Mirror
Layers - Arrange - Move Down
Open & Copy Paper 2
Paste As New Layer & Resize By 60%
Movwe To Inside Frame
Layers - Arrange - Move Dpwn
Activate Frame Layer & Magic Wand Tool
Click Inside Frame
Selections - Modify - Expand By 15 - Invent
Activate Wicked Red Queen Layer & Hit Delete On Your Keyboard
KEEP SELECTED
Repeat For Duplicate Layer & Paper Layer
Selections None
Activate Frame Layer
Open & Copy The Following Elements:-
73 - Resize by 35%
17
33 - Resize by 65%
71 - Resize by 85% - NO DS NEEDED
76 - Resize By 50% - NO DS NEEDED
32 - Resize By 50%
6 - Resize by 75% - Free Rotate Left By 22 Degrees
10 - Resize By 40%
7 - Resize By 60%
42 - Resize By 50%
34 - Resize by 25%
13 - Resize by 35% - Mirror
43 - Resize by 40% - Mirror - NO DS NEEDED
36 - Resize by 30% - NO DS NEEDED - Mirror
68 - Resize by 30% - Mirror
23 - Resize by 35% - Mirror - NO DS NEEDED
44 - Free Rotate Right By 22 Degrees
Layers - Arrange - Send To Bottom
2 - Resize by 70%
Activate Full Version Of Wicked Red Queen
Copy & Paste As New Layer
Move To Right Handside Of Frame
Open Paper 5
Layers - Promote Background Layer To Raster - New Mask Layer From Image
Select Mask - WSL_Mask84
Make sure Source Luminance is checked only
Copy Merged and Paste as new layer
Layers - Arrange - Send To Bottom
Activate Your Top Layer
Layers New Raster Layer - Add All Copyright Info
Layers New Raster Layer - Add Watermark
Layers New Raster Layer
Select Your Text Tool
Select Your Font I have used Wonderland - Size 50 - Stroke 2 - Bold
Click Foreground and change to #Black
Click Background and Change to #b01315
Type Your Name
Convert Raster To Layer
Plug Ins: Eyecandy 4000 - Gradient Glow
Color: #ff0000
Glow Width: 3.00
Soft Corners: 25
Overall Op: 100
Draw Only Outside Selection Checked
Click Ok
All Done
Thank you very much for following my Tutorial
I would love to see your results
and
any feedback
Please Email Me
At
Dont Forget To Check-Out Michelle's Blog
Tutorial Written By ChocUkDesigns
Retained by "Copyright © ChocUkDesigns 2015 All rights Reserved"
YAFO-TIEE-FGXP-IGCG
Thursday, 28 May 2015
CT ChocUkDesigns For Dance In The Rain PTU Tutorial For Piper Scrap Kit
CT ChocUkDesigns For Dance In The Rain
PTU Tutorial For Piper Scrap Kit


DO NOT COPY AND SHARE
PLEASE DIRECT PEOPLE TO MY BLOG
DO NOT CLAIM AS YOUR OWN
Supplies Need:-
Scrap Kit Used: DITR's - Piper Kit
Which You Can Purchase This Awesome Kit At:-
PicsForDesign:-
Or
Smiley Creations Shop
Or
Heatbeatz Creationz
Tube: GraphFreaks - Piper
Check-Out Her Blog
Plug Ins: Xero - Radiance
EyeCandy 4000 - Gradient Glow
Font Of Choice
A Working knowledge Of PSP
Lets Begin With My Tutorial
Open PSP and Your Tube
Open a New 700 x 700 Resolution 200
Using The Following Drop Shadow UNLESS STATED:-
V&H: 1 OP: 60 Blur: 2 Color: Black
Repeat With V&H: -1
Open & Copy Frame 2
Paste As New Layer & Resize By 85%
Activate Half Version Of Piper & Copy
Paste As New Layer & Mirror
Place On Left Handside Frame
Activate Eraser Tool & Erase Bottom Of Tube
So She Looks Like Shes Popping Out Of The Frame
Activate Full Version Of Piper
Copy & Paste As New Layer
Move To Right Handside OF Frame
Activate Close Up Version Of Piper & Copy
Paste As New Layer & Move Into Frame On Righthand Side
Plug In: Xero - Radiance
Strangeness: 120
Charm: 41
Truth: 85
Beauty: 255
Click Ok
Layers - Properties
Blend Mode: Luminance (Legacy)
Op: 80%
Click Ok
Adjust - Sharpen - Shapren More x2
Layers - Arrange - Move Down
Open & Copy Paper 4
Paste As New Layer & Resize By 60%
Move To Righthand Side Frame
Layers - Arrange - Move Down
Open & Copy Paper 11
Paste As New Layer & Resize By 40%
Move To Inside Left Handside Frame
Activate Frame Layer & Magic Wand Tool
Click Inside Right Handside Frame
Selections - Modify - Expand By 10 - Invent
Activate Close Up Of Piper & Hit Delete On Your Board
KEEP SELECTED
Activate Paper 4 Layer & Hit Delete On Your Keyboard
Selections None
Activate Frame Layer
Click Inside Left Handside Frame
Selections - Modify - Expand By 10 - Invent
Activate Paper 11 Layer & Hit Delete On Your Board
Selections - None
Activate Frame Layer
Open & Copy The Following Elements:-
49 - Resize By 75% - Mirror
35 - Resize By 25%
46 - Resize By 25% - Mirror
33 - Resize by 60%
23 - Resize by 60%
50 - Resize By 15%
34 - NO DS NEEDED
32 - Resize by 85%
30 - Resize By 85% - NO DS NEEDED
Layers - Arrange - Send Down To Bottom
Layers - Duplicate
Layers - Duplicate - Mirror
Layers - Duplicate
53 - Resize By 70% - Mirror - NO DS NEEDED
47 - Resize By 50%
Layers - Duplicate
Layers - Duplicate - Mirror
Layers - Duplicate
37 - Resize By 75% - Free Rotate Left By 22 Degrees
Layers - Duplicate - Mirror
Resize by 50%
Activate Top Layer
38 - Resize By 20% - Mirror
Activate Your Top Layer
Layers New Raster Layer - Add All Copyright Info
Layers New Raster Layer - Add Watermark
Layers New Raster Layer
Select Your Text Tool
Select Your Font I have used Leaf1 -Bold
- Size 50 (resize To Preferred) - Stroke 2 - Bold
Click Foreground and change to #9a4620
Click Background and Change to #e5744f
Type Your Name
Convert Raster To Layer
Plug Ins: Eyecandy 4000 - Gradient Glow
Color: #bdbc3a
Glow Width: 3.00
Soft Corners: 25
Overall Op: 100
Draw Only Outside Selection Checked
Click Ok
Delete your Preset Shape Layer
All Done
Thank you very much for following my Tutorial
I would love to see your results
and
any feedback
Please Email Me
At
Dont Forget To Check-Out DITR's Blog
Tutorial Written By ChocUkDesigns
Retained by "Copyright © ChocUkDesigns 2015 All rights Reserved"
H2VC-JPS3-4ESM-FQTP
Wednesday, 20 May 2015
NEW RELEASE IN STORES NOW - Elegance In Steam PTU Scrap Kit
Hi All
Here Is A New Release
Elegance In Steam Scrap Kit

A Steampunk Themed Kit With A Touch Of Class & Elegance!
Perfect For All Your Steampunk Projects
176x Elements & 20x Papers
800x800 Tagger Size
Personal Use Only
Perfect For All Your Steampunk Projects
176x Elements & 20x Papers
800x800 Tagger Size
Personal Use Only
Only $1.50!!!!!!!!
You Can Purchase At All My Stores:-
You Can Purchase At All My Stores:-
Daelmans Designs
Sensibility Scrapping
Low Budget Scrapping
&
PicsForDesign
NEW RELEASE IN STORES NOW - Dance In The Steam PTU Scrap Kit
Hi All
Here Is A New Release
Dance In The Steam Scrap Kit

A Beautiful Steampunk Themed Kit Made For 1 Of My CT Members Dance In The Rain Because I Love Her & She Loves Steampunk lol
Comes With 162x Elements & 20x Papers
800x800 Tagger Size
Personal Use Only
Comes With 162x Elements & 20x Papers
800x800 Tagger Size
Personal Use Only
Only $1.50!!!!!!!!
You Can Purchase At All My Stores:-
You Can Purchase At All My Stores:-
Daelmans Designs
Sensibility Scrapping
Low Budget Scrapping
&
PicsForDesign
TAG SHOW OFF By CT La Vampiresa Designs Using My PTU Scrap Kit Gothicfornia Dreaming
TAG SHOW OFF
Just Wanted To Show Off These Kick Ass Tags Made For Me
By CT La Vampiresa Designs Using My PTU Scrap Kit
Gothicfornia Dreaming
Gothicfornia Dreaming


Dont Forget To Check-Out Her Awesome Blog

Gothicfornia Dreaming
My New Gothic Scrap Kit Full Of Blood Thirsty
& Spell Casting Elements.
Perfect For Any Tags With A Gothic, Vampire,
Witch Or Dark Theme
Comes With 227x Elements & 20x Papers
Tagger Sized
800x800
My New Gothic Scrap Kit Full Of Blood Thirsty
& Spell Casting Elements.
Perfect For Any Tags With A Gothic, Vampire,
Witch Or Dark Theme
Comes With 227x Elements & 20x Papers
Tagger Sized
800x800
Only $2!!!!!!!!
You Can Purchase At All My Stores:-
Digi Divas
http://digidivas.co.uk/shop/index.php?main_page=product_info&cPath=67_206_207&products_id=464
&
Digi Divas
http://digidivas.co.uk/shop/index.php?main_page=product_info&cPath=67_206_207&products_id=464
&
PicsForDesign
Friday, 15 May 2015
TAG & PTU TUTORIAL SHOW OFF By Syn's Designs For Smiley Creations Shop CT Using My Scrap Kit Gothicfornia Dreaming
TAG SHOW OFF
Just Wanted To Show Off Thes Awesome Tag Made For Me
By Syn's Designs For Smiley Creations Shop CT Using
My New PTU Scrap Kit Gothicfornia Dreaming
My New PTU Scrap Kit Gothicfornia Dreaming
Check-Out Her Awesome Blog As
She's Written A Tutorial As Well!!!!!!
She's Written A Tutorial As Well!!!!!!
http://syndesignz.blogspot.co.uk/2015/05/combined-tutorial-for-graphfreaks-and.html
She Has Also Made This Awesome Tag As Well

She Has Also Made This Awesome Tag As Well

Check-Out Her Awesome Blog As Well!!!!!!
Gothicfornia Dreaming
My New Gothic Scrap Kit Full Of Blood Thirsty
& Spell Casting Elements.
Perfect For Any Tags With A Gothic, Vampire,
Witch Or Dark Theme
Comes With 227x Elements & 20x Papers
Tagger Sized
800x800
My New Gothic Scrap Kit Full Of Blood Thirsty
& Spell Casting Elements.
Perfect For Any Tags With A Gothic, Vampire,
Witch Or Dark Theme
Comes With 227x Elements & 20x Papers
Tagger Sized
800x800
Only $2!!!!!!!!
You Can Purchase At All My Stores:-
You Can Purchase At All My Stores:-
Smiley Creations Shop
TAG SHOW OFF By CT Chocolate's Tags Using My Scrap Kit Gothicfornia Dreaming
TAG SHOW OFF
Just Wanted To Show Off This Kickass Timeline Made For Me
By Chocolate's Tags Using
My New PTU Scrap Kit Gothicfornia Dreaming
My New PTU Scrap Kit Gothicfornia Dreaming


Check-Out Her Awesome Blog As Well!!!!!!
http://chocolatekissesxoxo.blogspot.com/
Gothicfornia Dreaming
My New Gothic Scrap Kit Full Of Blood Thirsty
& Spell Casting Elements.
Perfect For Any Tags With A Gothic, Vampire,
Witch Or Dark Theme
Comes With 227x Elements & 20x Papers
Tagger Sized
800x800
My New Gothic Scrap Kit Full Of Blood Thirsty
& Spell Casting Elements.
Perfect For Any Tags With A Gothic, Vampire,
Witch Or Dark Theme
Comes With 227x Elements & 20x Papers
Tagger Sized
800x800
Only $2!!!!!!!!
You Can Purchase At All My Stores:-
Digi Divas
http://digidivas.co.uk/shop/index.php?main_page=product_info&cPath=67_206_207&products_id=464
&
Digi Divas
http://digidivas.co.uk/shop/index.php?main_page=product_info&cPath=67_206_207&products_id=464
&
PicsForDesign
TAG & PTU TUTORIAL SHOW OFF By CT Lady Death's Designs Using My Scrap Kit Carry On My Wayward Son
TAG SHOW OFF
Just Wanted To Show Off This Kickass Tag Made For Me
By Lady Death's Designs Using
My New PTU Scrap Kit Carry On My Wayward Son
My New PTU Scrap Kit Carry On My Wayward Son

Check-Out Her Blog As She Written An Awesome
Tutorial As Well!!!!!!

Carry On My Wayward Son.....
I Am A huge Supernatural Fan & Decided To Dedicate
My 1st Goth Kit To 1 OF My Favourite Tv Shows,
Whether Your A Dean, Sam, Castiel, Crowley or Even A Bobbys Girl
Or Even Not Even A Fan Of The Show But Love Dark Gothic Themed Kits
This Is For You!
P.S. If Your A Fan Of The Show Theres Some
Awesome Elements Including Dean's Baby!!!
Comes With 201x Elements & 21x Papers
Tagger Size
Personal Use Only
Only $2!!!!!!!!
You Can Purchase At All My Stores:-
Digi Divas
http://digidivas.co.uk/shop/index.php?main_page=product_info&cPath=67_206_207&products_id=463
&
PicsForDesign
TAG SHOW OFF By CT Heather's Sweet Designz Using My Scrap Kit For Angels & Artists Against Lyme
TAG SHOW OFF
Just Wanted To Show Off These Beautiful Tags Made For Me
By Heather's Sweet Designz Using
My New PTU Scrap Kit Angel & Artists Against Lyme


My New PTU Scrap Kit Angel & Artists Against Lyme


Check-Out Her Awesome Blog As Well!!!!!!
http://sweetdesignztags.blogspot.com/

AWESOME COLLAB WITH TONS OF BEAUTIFUL PRODUCTS!
WE ALL GOT TOGETHER
AND CREATED THIS COLLAB TO HELP
OUR DEAR FRIEND
ELIZABETH AUSTIN
ALL THE MONEY COLLECTED HERE
WILL BE FOR HER
CHECK-OUT THE COLLABS BLOG
WHERE YOU CAN ALSO PURCHASE IT*
WHERE YOU CAN ALSO PURCHASE IT*
http://angelsandartistsagainstlyme.blogspot.com/
*Please allow 24 hours for the Collab to be sent to you after purchase.
*Please allow 24 hours for the Collab to be sent to you after purchase.
TAG & PTU TUTORIAL SHOW OFF By CT Marcia Of OnePlus Creations Using My Scrap Kit Gothicfornia Dreaming
TAG SHOW OFF
Just Wanted To Show Off This Adorable Tag Made For Me
By Marcia Of OnePlus Creations Using
My New PTU Scrap Kit Gothicfornia Dreaming
My New PTU Scrap Kit Gothicfornia Dreaming

Check-Out Her Blog As She Written An Awesome
Tutorial As Well!!!!!!
http://onepluscreations.blogspot.co.uk/2015/05/gothicfornia-dreaming.html
Tutorial As Well!!!!!!
http://onepluscreations.blogspot.co.uk/2015/05/gothicfornia-dreaming.html
Gothicfornia Dreaming
My New Gothic Scrap Kit Full Of Blood Thirsty
& Spell Casting Elements.
Perfect For Any Tags With A Gothic, Vampire,
Witch Or Dark Theme
Comes With 227x Elements & 20x Papers
Tagger Sized
800x800
My New Gothic Scrap Kit Full Of Blood Thirsty
& Spell Casting Elements.
Perfect For Any Tags With A Gothic, Vampire,
Witch Or Dark Theme
Comes With 227x Elements & 20x Papers
Tagger Sized
800x800
Only $2!!!!!!!!
You Can Purchase At All My Stores:-
You Can Purchase At All My Stores:-
Digi Divas
http://digidivas.co.uk/shop/index.php?main_page=product_info&cPath=67_206_207&products_id=464
&
Digi Divas
http://digidivas.co.uk/shop/index.php?main_page=product_info&cPath=67_206_207&products_id=464
&
PicsForDesign
TAG SHOW OFF By CT Marisa's Twizted Tags Using My Scrap Kit Gothicfornia Dreaming
TAG SHOW OFF
Just Wanted To Show Off Thes Awesome Tags Made For Me
By Marisa's Twizted Tags Using
My New PTU Scrap Kit Gothicfornia Dreaming
My New PTU Scrap Kit Gothicfornia Dreaming


Check-Out Her Awesome Blog As Well!!!!!!
http://marisastwiztedtags.blogspot.com/
Gothicfornia Dreaming
My New Gothic Scrap Kit Full Of Blood Thirsty
& Spell Casting Elements.
Perfect For Any Tags With A Gothic, Vampire,
Witch Or Dark Theme
Comes With 227x Elements & 20x Papers
Tagger Sized
800x800
My New Gothic Scrap Kit Full Of Blood Thirsty
& Spell Casting Elements.
Perfect For Any Tags With A Gothic, Vampire,
Witch Or Dark Theme
Comes With 227x Elements & 20x Papers
Tagger Sized
800x800
Only $2!!!!!!!!
You Can Purchase At All My Stores:-
Digi Divas
http://digidivas.co.uk/shop/index.php?main_page=product_info&cPath=67_206_207&products_id=464
&
Digi Divas
http://digidivas.co.uk/shop/index.php?main_page=product_info&cPath=67_206_207&products_id=464
&
PicsForDesign
TAG SHOW OFF By CT Heather's Sweet Designz Using My Scrap Kit Gothicfornia Dreaming
TAG SHOW OFF
Just Wanted To Show Off These Awesome Tags Made For Me
By Heather's Sweet Designz Using
My New PTU Scrap Kit Gothicfornia Dreaming


My New PTU Scrap Kit Gothicfornia Dreaming


Check-Out Her Awesome Blog As Well!!!!!!
Gothicfornia Dreaming
My New Gothic Scrap Kit Full Of Blood Thirsty
& Spell Casting Elements.
Perfect For Any Tags With A Gothic, Vampire,
Witch Or Dark Theme
Comes With 227x Elements & 20x Papers
Tagger Sized
800x800
My New Gothic Scrap Kit Full Of Blood Thirsty
& Spell Casting Elements.
Perfect For Any Tags With A Gothic, Vampire,
Witch Or Dark Theme
Comes With 227x Elements & 20x Papers
Tagger Sized
800x800
Only $2!!!!!!!!
You Can Purchase At All My Stores:-
Digi Divas
http://digidivas.co.uk/shop/index.php?main_page=product_info&cPath=67_206_207&products_id=464
&
Digi Divas
http://digidivas.co.uk/shop/index.php?main_page=product_info&cPath=67_206_207&products_id=464
&
PicsForDesign
TAG SHOW OFF By CT La Guerita Designz Using My Scrap Kit Gothicfornia Dreaming
TAG SHOW OFF
Just Wanted To Show Off This Awesome Timeline Set Made For Me
By La Guerita Designz Using
My New PTU Scrap Kit Gothicfornia Dreaming
My New PTU Scrap Kit Gothicfornia Dreaming


Check-Out Her Awesome Blog As Well!!!!!!
http://lagueritadesignz.blogspot.com/
Gothicfornia Dreaming
My New Gothic Scrap Kit Full Of Blood Thirsty
& Spell Casting Elements.
Perfect For Any Tags With A Gothic, Vampire,
Witch Or Dark Theme
Comes With 227x Elements & 20x Papers
Tagger Sized
800x800
My New Gothic Scrap Kit Full Of Blood Thirsty
& Spell Casting Elements.
Perfect For Any Tags With A Gothic, Vampire,
Witch Or Dark Theme
Comes With 227x Elements & 20x Papers
Tagger Sized
800x800
Only $2!!!!!!!!
You Can Purchase At All My Stores:-
You Can Purchase At All My Stores:-
Digi Divas
http://digidivas.co.uk/shop/index.php?main_page=product_info&cPath=67_206_207&products_id=464
&
Digi Divas
http://digidivas.co.uk/shop/index.php?main_page=product_info&cPath=67_206_207&products_id=464
&
PicsForDesign
Saturday, 9 May 2015
CT ChocUkDesigns For ChocUkDesigns PTU Tutorial For Carry On My Wayward Son Scrap Kit
CT ChocUkDesigns For ChocUkDesigns
PTU Tutorial For Carry On My Wayward Son Scrap Kit

Winchester Layer

Dean Layer

Sam Layer
DO NOT COPY AND SHARE
PLEASE DIRECT PEOPLE TO MY BLOG
DO NOT CLAIM AS YOUR OWN
Supplies Need:-
Scrap Kit Used: CD's - Be Mine Kit
PicsForDesigns:-
Tube: An Exclusive Tube By Zebrush - Dean
You Can Download By Purchasing An Exclusive Membership
At PicsForDesign :-
&
Tube: Katharine's - Sam
You Can Purchase At PicsForDesign :-
Please Note You Need A License To Use Both These Tubes
Mask : WSL_Mask84
Which You Can Download From Their Blog
Plug Ins: EyeCandy 4000 - Gradient Glow
Font Of Choice
A Working knowledge Of PSP
Lets Begin With My Tutorial
Open PSP and Your Tube
Open a New 750 x 750 Resolution 200
Using The Following Drop Shadow UNLESS STATED:-
V&H: 1 OP: 80 Blur: 2 Color: Black
Repeat Using V&H:-1
Open & Copy Frame 14
Paste As New Layer - V: 1 H: -1 OP: 80 Blur: 2 Color: Black
Activate Your Tube (Sam)
Copy & Paste As New Layer - V: 1 H: -1 OP: 80 Blur: 2 Color: Black
Resize by 30% & Move To Right Side Of The Frame
Activate Your Tube (Dean)
Copy & Paste As New Layer - V: 1 H: -1 OP: 80 Blur: 2 Color: Black
Resize by 43% & Move To The Left Side Of The Frame
(This Is If You Want Both Tubes On Your Tag, If Not:-
Then Just Follow Steps For Either Sam Or Dean)
Open & Copy The Following Elements:-
105 - Resize by 40%
150 - Resize By 35%
68 - Resize By 50% - Mirror
115 - Resize By 35%
129 - Resize By 35%
84 - Resize By 35%
Activate Frame Layer
170 - NO DS NEEDED
1 - Resize By 50%
102 - Resize by 60%
Layers - Duplicate - Mirror
160 - Resize By 75%
Layers - Duplicte - Mirror
23 - Resize by 75%
48 - Resize By 25%
125 - Resize by 75%
156
46 - Resize By 40%
95 - Resize By 75%
62 - Resize By 50%
146 - Resize By 50%
77 - Resize By 50%
3 - Resize By 50%
31 - Resize By 70%
Layers - Arrange - Send To Bottom
Activate Eraser Tool & Erse Parts Sticking Out Of Frame
88 - Resize By 70%
Activate Eraser Tool & Erse Parts Sticking Out Of Frame
103 - Resize By 30%
138 - Resize by 30%
87 - Resize By 75%
Open Paper 5
Layers - Promote Background Layer To Raster - New Mask Layer From Image
Select Mask - WSL_Mask84
Make sure Source Luminance is checked only
Copy Merged and Paste as new layer
Layers - Arrange - Send To Bottom
Layers - Duplicate - Mirror
Layers - Merge - Merge Down
Lyers - Duplicate - Flip
Activate Top Layer
Layers New Raster Layer - Add All Copyright Info
Layers New Raster Layer - Add Watermark
Layers New Raster Layer
Select Your Text Tool
Select Your Font I have used
Supernatural Knight - Size 48 (resize To Preferred) - Stroke 2 - Bold
Click Foreground and change to #800303
Click Background and Change to Black
Convert Raster To Layer
Plug Ins: Eyecandy 4000 - Gradient Glow
Color: #808080
Glow Width: 3.00
Soft Corners: 25
Overall Op: 100
Draw Only Outside Selection Checked
Click Ok
Repeat Plug In
All Done
Thank you very much for following my Tutorial
I would love to see your results
and
any feedback
Please Email Me
At
Dont Forget To Check-Out Chocy's Blog
Tutorial Written By ChocUkDesigns
Retained by "Copyright © ChocUkDesigns 2015 All rights Reserved"
EKHX-XJZA-D2SY-NIR3
CT ChocUkDesigns For Michelle's Myths/Michelle's Myths Dolls PTU Tutorial For Elise Doll & Acheron (A Dark Hunter Kit) Scrap Kit
CT ChocUkDesigns For Michelle's Myths/Michelle's Myths Dolls
PTU Tutorial For Elise Doll & Acheron (A Dark Hunter Kit) Scrap Kit


DO NOT COPY AND SHARE
PLEASE DIRECT PEOPLE TO MY BLOG
DO NOT CLAIM AS YOUR OWN
Supplies Need:-
Scrap Kit Used: Michelle's Myth's - Acheron (A Dark Hunter Kit)
Which You Can Also Purchase At
Michelle's Myths Store
Or
Smiley Creations Shop
Poser: Michelle's Myths Dolls - Elise
You Can Purchase This Doll Only At
PicsForDesign
Mask: WSL_Mask84
Which You Download From Their Blog
Plug Ins: Xero - Radiance
EyeCandy 4000 - Gradient Glow
Font Of Choice
A Working knowledge Of PSP
Lets Begin With My Tutorial
Open PSP and your Tubes
Open a New 800 x 800 Resolution 200
Use The Following Drop Shadow Unless Stated
V&H: 1 OP: 50 Blur: 2 Color: Black
Repeat V&H: -1
Open & Copy Frame 1
Paste As New Layer
Open & Copy Frame 6
Paste As New Layer & Resize By 85%
Activate Close Up Of Your Doll & Freehand Selection Tool
Draw Round Her Head
Copy As Merged & Paste As New Layer
Layers - Arrange - Send To The Bottom
Place Inside Frame
Plug In: Xero - Radiance
Strangeness: 15
Charm: 97
Truth: 128
Beauty: 255
Click Ok
Adjust - Sharpen - Sharpen More
Layers - Properties - Blend Mode: Luminance (Legacy)
Open & Copy Paper 7
Layers - Arrange - Move Down
Activate Top Layer & Magic Wand Tool
Click Inside Frame
Selections - Modify - Expand by 20 - Invent
Activate Tube Layer & Hit Delete On Your Keyboard
KEEP SELECTED
Repeat For Paper Layer
Selections None
Activate Top Layer Again
Open & Copy The Following Elements:-
19 - Resize by 75%
47 - Resize by 75%
45
3
4 - Resize by 75%
8
21 - Resize by 50% - Free Rotate Right By 22 Degrees
5 - Resize By 75%
18 - Resize By 75%
9 - Resize by 75%
36 - Resize by 75%
32 - Resize by 50%
7 - Resize by 60%
26 - Resize by 50%
Layers - Arrange - Send To Bottom
24 - Resize by 50% - NO DS NEEDED - Free Rotate Left By 22 Degrees
Layers - Duplicate - Mirror
25 - NO DS NEEDED
Layers - Duplicate - Mirror
Activate Top Layer
Activate Full Version Of Your Doll
Copy & Paste As New Layer
Resize By 60%
Move To Left Handside Of Canvas
Open Paper (8)
Layers - Promote Background Layer To Raster - New Mask Layer From Image
Select Mask - WSL_Mask84
Make sure Source Luminance is checked only
Copy Merged and Paste as new layer
Layers - Arrange - Send To Bottom
Resize by 145%
Layers - Duplicate - Mirror
Activate Your Top Layer
Layers New Raster Layer - Add All Copyright Info
Layers New Raster Layer - Add Watermark
Layers New Raster Layer
Select Your Text Tool
Select Your Font I have used Skullphabet - Size 48 - Stroke 2 - Bold
Click Foreground and change to #9e9c9a
Click Background and Change to Black
Type Your Name
Convert Raster To Layer
Plug Ins: Eyecandy 4000 - Gradient Glow
Color: White
Glow Width: 3.00
Soft Corners: 25
Overall Op: 100
Draw Only Outside Selection Checked
Click Ok
All Done
Thank you very much for following my Tutorial
I would love to see your results
and
any feedback
Please Email Me
At
Dont Forget To Check-Out Michelle's Blog
Tutorial Written By ChocUkDesigns
Retained by "Copyright © ChocUkDesigns 2015 All rights Reserved"
AI6C-BPUH-LSVN-CCFM
Subscribe to:
Posts
(Atom)
Copyrighted

My Stores


CU License


