Grab 1 OF My Blinkies


My Logo

My Licenses


ChocUkDesigns On Facebook


Monday, 16 May 2016
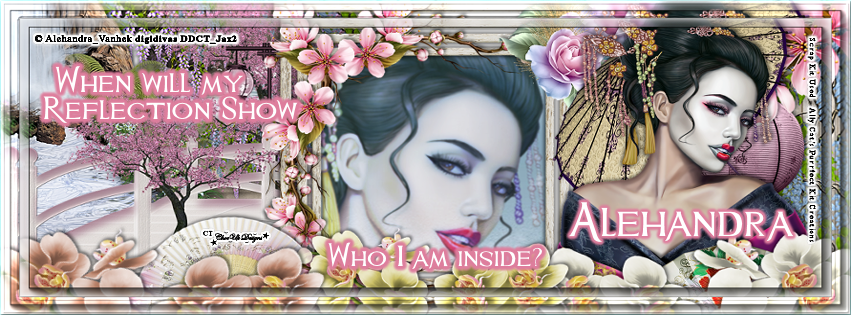
CT ChocUkDesigns PTU Tutorial For Digi Divas On Behalf Of Alehandra Vanhek For Geisha & Ally Cat's Purrfect Kit Creations' Matching Scrap Kit - Timeline Set
CT ChocUkDesigns PTU Tutorial For Digi Divas
On Behalf Of Alehandra Vanhek For Geisha
& Ally Cat's Purrfect Kit Creations' Matching Scrap Kit - Timeline Set


DO NOT COPY AND SHARE
PLEASE DIRECT PEOPLE TO MY BLOG
DO NOT CLAIM AS YOUR OWN
Supplies Need:-
Tube: Alehandra Vanhek - Geisha
You Can Purchase This Gorgeous Tube
At Digi Divas:-
Scrap Kit Used: ACPKC's - Geisha
Which Is An Exclusive Kit Match
Which You Can Also Purchase Exclusively At:-
Digi Divas
Plug In: Xero - Porcelain
AAA Frames - Foto Frame
EyeCandy 4000 - Gradient Glow
Font Of Choice
A Working knowledge Of PSP
Lets Begin With My Tutorial
Open PSP & Your Tube
For Banner
Open a New 851 x 315 Resolution 200
Using The Following Drop Shadow UNLESS STATED:-
V&H: 2 OP: 50 Blur: 5 Color: Black
Repeat With V&H: -2
Open & Copy Paper 2
Paste As New Layer
Activate Freehand Selection Tool & Activate Geisha
Remove Make Up Layer & Draw Round Her Head
Copy As Merged & Paste As New Layer On Canvas
Resize By Resize By 80%
Plug: in: Xero - Porcelain
Softness: 50
Strength: 128
Brightness: 128
Red Channel: 0
Green Channel: 0
Blue Channel: 255
Click Ok
Adjust - Soften - Soften More
Layers - Properties:-
Blend Mode: Hard Light
Op:80%
Click Ok
Open & Copy Frame 6
Paste As New Layer & Resize By 65%
Move So Tube's Face Fits In Middle Square
When Happy Activate Magic Wand Tool
Click Inside Middle Square
Selections - Expand By 13 - Invent
Activate Tube Layer & Hit Delete On Your Keyboard
KEEP SELECTED
Activate Paper Layer & Again Hit Delete
Selections - None
Activate Top Layer
Activate Tube Again
Selections - None
Add Make Up Layer & Copy As Merged
Paste As New Layer & Resize By 45%
Open & Copy The Following Elements :-
Activate Bottom Layer
34
29
43
18 - Resize By 75%
40 - Resize By 60%
24 - Resize By 75% - NO DS NEEDED
Activate Frame Layer
17 - Flip - Resize By 55%
48 - Resize By 55%
23 - Resize By 55%
Activate Top Layer
15 - Resize By 50% - Free Rotate Left By 22 Degrees
13 - Resize By 60% - Free Rotate Left By 60 Degrees - Mirror
11 - Resize By 50% - Free Rotate Left By 60 Degrees
12 - Resize By 60% - Free Rotate Left By 60 Degrees
Hold Shift + D To Duplicate Canvas
Move To Side For Now Will Be Using For Avatar
Layers - Merge - Merge All (Flattern)
Plug In: AAA Frames - Foto Frame:-
Width: 10
Brightness:50
Stroke: 20
Matte: 0
Red: 0
Green: 0
Blue: 0
Op:70
Click Ok
Image - Add Borders
Original Dimensions - Pixels Selected
Symmetric Checked
Size In Pixels:20
Color: Blue (For Now)
Click Ok
Activate Magic Wand & Click Inside Border
Selections - Invent
Edit - Copy
Effects - 3D Effects
Cutout:-
Offset:- Vertical & Horisontal: 2
Attributes:- Opacity: 75 Blur: 10.00
Color:- Shadow Color: #f6f6f6
Back Fill Interior With Color: Unchecked
Click Ok
Repeat With V&H: -2
Selections - Invent
Edit - Paste Into Selection
Effects - 3D Effects - Inner Bevel:-
Bevel:-
Bevel: 6
Width: 5
Image:-
Smoothness: 5
Depth:2
Ambience: 2
Shininess: 1
Light:-
Color: White
Angle: 325
Intensity: 40
Elevation: 50
Click Ok
Selections - None
Image - Resize With Following Settings:-
Make Sure At Bottom Use The Following Settings:-
Resample Using: Bicubic & Checked
Maintain Original Print Size & Lock Aspect Ratio - Both Unchecked
Resize All Layers: Checked
Pixel Dimensions (100%x100%)
Width: 851
Height: 315
Pixels: Selected From Drop Down
Print Size:
Width: 2.837
Height: 1.050
Pixels: Selected From Drop Down
Resolution: 300.000
Pixels/Centimeter: Selected From Drop Down
Click Ok
Activate Your Top Layer
Layers New Raster Layer - Add All Copyright Info
Layers New Raster Layer - Add Watermark
Mulan - Size 24 - Stroke 2 - Bold
Click Foreground and change to Close Off
Click Background and Change to White
Type The Following:-
When Will My
Reflection Show
Who I Am Inside
Position WordArt
Convert Raster To Layer
Plug Ins: Eyecandy 4000 - Gradient Glow
Color: #de7e9d
Glow Width: 5.00
Soft Corners: 25
Overall Op: 100
Draw Only Outside Selection Checked
Click Ok
Repeat Gradient Glow
Glow Width: 3.00
Click Ok
Mulan - Size 48 (resize To Preferred) - Stroke 2 - Bold
Click Foreground and change to Close Off
Click Background and Change to White
Type Your Name (Optional)
Convert Raster To Layer
Plug Ins: Eyecandy 4000 - Gradient Glow
Color: #de7e9d
Glow Width: 3.00
Soft Corners: 25
Overall Op: 100
Draw Only Outside Selection Checked
Click Ok
Repeat Plug In
All Done
Save As Either JPEG Or PNG

For Avatar
Activate Duplicate Image from Earlier
Activate Crop Tool
Draw Inside Timeline Cover
Make Sure Width Is: 300
Make Sure Height Is: 300
Place Square In Position Your Happy With
Once Happy Double Click On Your Mouse
I Chose Right Hand Side
Layers - Merge - Merge All (Flatten)
Repeat Above Steps From Banner
Starting From
AAA Frames - Foto Frame:-
Stop At Resize
Activate Your Top Layer
Layers New Raster Layer - Add All Copyright Info
Layers New Raster Layer - Add Watermark
Layers New Raster Layer
Activate Font Tool
Mulan - Size 48 (resize To Preferred) - Stroke 2 - Bold
Click Foreground and change to Close Off
Click Background and Change to White
Type Your Name (Optional)
Convert Raster To Layer
Plug Ins: Eyecandy 4000 - Gradient Glow
Color: #de7e9d
Glow Width: 3.00
Soft Corners: 25
Overall Op: 100
Draw Only Outside Selection Checked
Click Ok
Repeat Plug In
All Done
Save As Either JPEG Or PNG
Thank you very much for following my Tutorial
I would love to see your results
and
any feedback
Please Email Me
At
Dont Forget To Check-Out Ally's Blog
Ally Cat's Purrfect Kit Creations
&
Digi Divas
Tutorial Written By ChocUkDesigns
Retained by "Copyright © ChocUkDesigns 2016 All rights Reserved"
ELMO-HYNW-DYIY-GHDX
Subscribe to:
Post Comments
(Atom)
Copyrighted

My Stores


CU License


0 comments:
Post a Comment